My MotoVespa GT 160 Project
I bought my MotoVespa GT 160 project in January 2025 from a seller in Bradford. The scooter was listed for sale on a MotoVespa GT 160's owners' page on Facebook. Immediately I loved the look of the scooter as it had been sprayed Lotus Orange. At first I was unsure about buying the scooter, as I had not seen the Vespa up close and had not met the seller face to face. But sometimes you have got to take chances in life, and I decided to go ahead and take the leap. Thankfully the seller was a top bloke.
A local courier company 'BookMySpace' collected the Vespa and delivered it to me in Jersey. The scooter arrived just as it was in the photos, so I cannot thank 'BookMySpace' enough for that. It was then time to get on with the build!

My MotoVespa once it had arrived
First of all I decided to pull apart the engine to see what needed to be changed. As always there is a problem at the first hurdle.
I could not remove the flywheel nut as it had rusted itself on. My dad and I had to drill it off the crank taper. It took a lot of work and patience to remove the nut, but finally it came off. I then used my puller tool to remove the flywheel from the engine. Once the flywheel was off I could then finally extract the rest of the engine's components. Once the engine was stripped it was obvious that most of the parts had seen better days. What would you expect? The scooter's speedo read over 68,000 miles. The engine definitely needed attention. I visited Jersey's scooter guru, Steve and asked if he would help me with the rebuild. After much discussion we came to the conclusion not to upgrade the engine and to possibly fit something different...I will come back to this a little later.

MotoVespa GT 160 engine
In the meantime I went on to rebuild the forks. These had already been sprayed black but the shock absorber and front spring did need replacing. To remove the old spring we used a harness to pull it away from the fork. The spring's threaded end then came away from the fork's securing hole. I then just had to twist the old spring off its securing mount. The old shock absorber had already been removed by the previous owner. I then went on to rebuild the forks using a new spring and shocker. Putting the new spring in was a bit of a pain but we did get there in the end. I then fitted the mudguard to the forks with the securing screws and without scratching the new spray job. These were now ready to fit in to the scooter.

The forks after they had been rebuilt
Before I could fit the forks I had to prepare the frame. I started with installing the new floor runners. The only problem was there were no holes in the frame to fit the new rivets to hold the runners down. My dad and I had to measure the specific points on the frame for the new holes to be drilled. Luckily, we managed to get the holes in the right position and using the rivet gun clamped the runners to the floor. The rubber strips were then cut to the right length to be fitted. Surprisingly, putting the floor runners on was easier than fitting the leg shield trim. I had bought a plastic leg shield trim which just did not want to mould with the frame. I heated the trim to see if it would fit better but it just did not want to go on. Instead I used a rubber leg shield trim that fitted straight on to the scooter with no problems.
Once these accessories were completed I threaded the electrics and cables in to the frame along with fitting the scooter's stand. An essential item! These jobs were surprisingly straight forward and did not take long at all to finish. I was now able to fit the forks to the scooter.
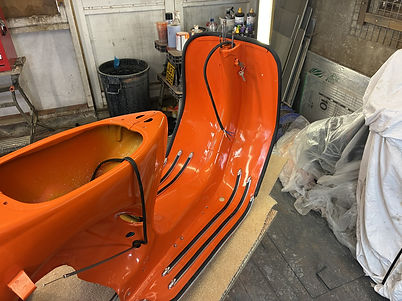

Pictures of the GT with the cables and forks fitted
Once the forks were in place with the front wheel I then went on to fit the headset. Before doing this I built the new headset using new throttle and gear cable pulleys along with installing new handlebar tubes. The new headset took a bit of manipulating to fit but eventually it slotted right in to place. I also fitted the glovebox too as I didn't like how bare the front end of the scooter looked. It must have been OCD!
Now what could possibly come next... the engine.
I know the talk of the engine is probably one of the most exciting parts of the whole build. It certainly was for me. After speaking with Steve I decided to go ahead with fitting a Vespa T5 engine to the scooter. As always excitement kicks in with restoring an engine and I decided to go ahead with fitting a kit to it. This was a Quattrini Kit which would put the engine up to a 175cc. Now a standard Vespa T5 engine is normally enough, but I would like to take this Vespa to Scooter Rallies abroad so I needed something with a little extra kick. Steve helped with the rebuild of the engine and I certainly learnt a lot from him. I also learnt how to empty my pockets, but anyone in the Scootering Scene understands this. After a few weeks the engine was finally completed by Steve and ready to fit in to the scooter. Once the engine was placed in the frame I also attached the rear wheel so the scooter would be more balanced.


The engine after it was rebuilt and then finally fitted to the scooter
Now it was back to the small jobs. I attached and set up the gear cables, clutch cable, back brake cable and the front brake cable. The clutch cable was a two man job, as it was very difficult to keep the engine's clutch lever pushed up whilst tightening the cable nipple. My dad and I got there in the end.
Steve helped me make a throttle cable for the Dellorto PHPB carb. The SIP 3 road exhaust fitted well to the engine with a few taps of the rubber hammer. Securing the back light in place I had to ensure I didn't screw the plastic lens too tight. I have done this before and heard a sharp crack!
I enjoyed these jobs but remembered fitting the fuel tank with its new fast flow fuel tap was next. This is one job to test your patience. The GT's fuel tank hole is extremely small and using the spanner tool to tighten the tank's securing nut can definitely age you. But as they say you must persevere and I finally did it.
I had ordered a custom MotoVespa crest badge for the front of the scooter which I now put in place along with the rear badge.
The next task was to connect the wiring loom for the headlight, horn and kill switch along with sorting the timing on the engine, for these jobs I needed Steve's help. Straight away he noticed a problem with the front forks. It turns out I had put two lower steering races in to the fork tube which meant the forks were sitting loose. I need to go to Spec Savers! Steve rectified this issue and the steering as you can imagine, felt a lot better. There were a few other issues that Steve helped rectify, but before long he was on to connecting up the electrics in the headset and altered the engine's timing.
The Vespa GT up at Steve's Workshop
We tested to see if the scooter would start and on the second kick it fired up. I took the scooter out for a ride and noticed the front end had a slight wobble. Steve concluded the front spring had to be changed for a less uprated version. This was the reason the scooter could not run in a straight line. However, the scooter's engine did run nicely. Once the spring was changed there was a huge difference in how the scooter handled, and it was for the better. Now I could take the scooter back to my workshop to complete adding the last few badges. This is the most precise part of the whole restoration process!

The GT after it's first ride
The customised MotoVespa badge was made by Andrea at Personalizzazioni Gadget Per Mezzi and the detail was top quality. To fit the badge I used an adhesive along with tape to keep the badge in the correct position whilst it was drying. Nothing looks worse than a wonky badge. To fit the rear Gran Turismo badge to the scooter my dad and I had to drill holes in the back of the frame just under the seat. We could then press the badge in to place. After all the hard work the scooter was finally complete and ready for registration. I really hope I do not have any problems. Fingers crossed!
I hope you all enjoyed this write up, and there will be plenty more to come!


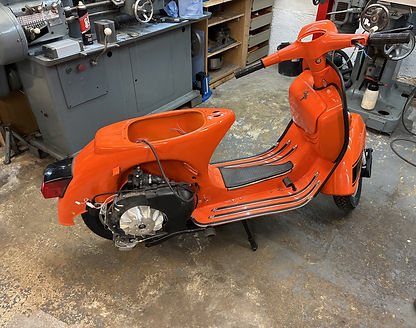
The finished product!